Tips and Recipes
Mark Bittman's Simplest and Best Shrimp July 22 2011, 2 Comments
This easy and tasty recipe is one your kids can make! Mark Bittman's Simplest Shrimp.
Watermelon Gazpacho July 20 2011, 0 Comments
Watermelon is a summer favorite at our house. This is a great opportunity for the kids to 2x their points by trying something new! From NYTimes Recipes for Health: Watermelon Gazpacho.
Oatmeal with cherries and pistachios July 19 2011, 1 Comment
A yummy recipe from Martha Rose Shulman...a simple twist on morning oatmeal.
Summer Zucchini Bread from Simply Recipes! July 08 2011, 0 Comments
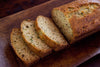 Another yummy recipe from Simply Recipes: Lemon Rosemary Zucchini Bread!
2x your points with Miso! July 02 2011, 0 Comments
An easy ingredient to use with everything from fish to veggies: Miso!
Buzzing in my head June 30 2011, 2 Comments
For months I've had an idea buzzing in my head. It started from the notion that I wanted to do something meaningful for myself and my kids. As a mom, one of my top priorities is to keep my children happy and healthy.
Fast forward to dinner time. At 2 years old, my daughter had a wonderful repertoire of food favorites -- from mussels to mushrooms. But as she grew, her choices narrowed and the constant editing of her plate resulted in a mass of white. Where did I go wrong? We needed a change.
It started with a simple idea. At dinnertime, the challenge was to fill your plate with a rainbow of colors. The game grew and morphed, with the help of my husband and kids, into Crunch a ColorTM(copyright 2011, Tiny Green Bee, LLC). To hear my son exclaim, "Mom, I need a Green. Can you make me some broccoli?", was a truly joyful moment. No longer was I declaring, "Eat your veggies!" Now they were driving the bus, and it was going in a direction that I liked!
As parents we all strive to give the best to our children. My hope is that Tiny Green Bee can support that effort. By helping us make healthy choices. By giving back to create a generation of strong and healthy kids. And, most importantly, by keeping it fun.
Enjoy the game, share what I can do to improve and your ideas for fun and easy recipes, and definitely let me know if your little ones are eating more broccoli!
Cheers,
Jennifer
- Previous
- Page 6 of 6