Tips and Recipes
A Simple Bok Choy Recipe (52 New Foods, Around the World Week 4) January 26 2013, 12 Comments
 Our simple, sizzling bok choy recipe with a hint of garlic and ginger
makes a super side for a healthy supper.
Our simple, sizzling bok choy recipe with a hint of garlic and ginger
makes a super side for a healthy supper.
 Our simple, sizzling bok choy recipe with a hint of garlic and ginger
makes a super side for a healthy supper.
Our simple, sizzling bok choy recipe with a hint of garlic and ginger
makes a super side for a healthy supper.Easy Orange Granita Recipe (52 New Foods, Around the World Week 3) January 18 2013, 5 Comments
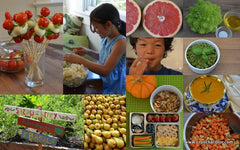
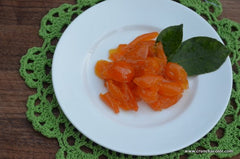
 This easy orange granita recipe was a deliciously fun
project for my kids and me! A simple twist on a favorite fruit: Satsuma
Mandarin Oranges.
This easy orange granita recipe was a deliciously fun
project for my kids and me! A simple twist on a favorite fruit: Satsuma
Mandarin Oranges.
 This easy orange granita recipe was a deliciously fun
project for my kids and me! A simple twist on a favorite fruit: Satsuma
Mandarin Oranges.
This easy orange granita recipe was a deliciously fun
project for my kids and me! A simple twist on a favorite fruit: Satsuma
Mandarin Oranges. Sesame Green Bean Salad (52 New Foods, Around the World Week 2) January 12 2013, 2 Comments
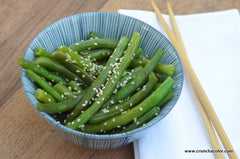 A simple sesame green bean salad adds a new twist to
an old favorite and makes supper super fun!
A simple sesame green bean salad adds a new twist to
an old favorite and makes supper super fun!
 A simple sesame green bean salad adds a new twist to
an old favorite and makes supper super fun!
A simple sesame green bean salad adds a new twist to
an old favorite and makes supper super fun!Easy Asian Pear Sauce (52 New Foods, Around the World Week 1) January 07 2013, 7 Comments
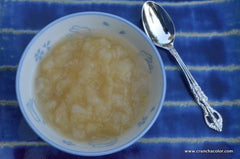 Pear sauce made with crisp Asian pears and a hint of
ginger is an easy and fun twist on homemade applesauce.
Pear sauce made with crisp Asian pears and a hint of
ginger is an easy and fun twist on homemade applesauce.
 Pear sauce made with crisp Asian pears and a hint of
ginger is an easy and fun twist on homemade applesauce.
Pear sauce made with crisp Asian pears and a hint of
ginger is an easy and fun twist on homemade applesauce. One New Healthy Food a Week (52 New Foods) January 04 2013, 3 Comments

52 weeks, 52 new foods. This simple challenge planted the seeds of change at our family table. Pick a new healthy food to try each week and join the adventure!
Best Healthy Recipes of 2012 (52 New Foods) January 03 2013, 5 Comments
 The best healthy recipes of 2012 as voted by the toughest food critics at the
table!
The best healthy recipes of 2012 as voted by the toughest food critics at the
table!
 The best healthy recipes of 2012 as voted by the toughest food critics at the
table!
The best healthy recipes of 2012 as voted by the toughest food critics at the
table!Kumquat Jam (Week 51, 52 New Foods) December 31 2012, 21 Comments
 Kumquat jam adds a simple splash of citrus to savory
dishes: a burst of sunshine to start the New Year!
Kumquat jam adds a simple splash of citrus to savory
dishes: a burst of sunshine to start the New Year!
 Kumquat jam adds a simple splash of citrus to savory
dishes: a burst of sunshine to start the New Year!
Kumquat jam adds a simple splash of citrus to savory
dishes: a burst of sunshine to start the New Year!Cranberry Pomegranate Sauce (Week 50, 52 New Foods) December 19 2012, 4 Comments
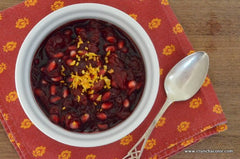 Cranberry pomegranate sauce is a playful twist on a
familiar favorite: an easy way to welcome a new food to your holiday table!
Cranberry pomegranate sauce is a playful twist on a
familiar favorite: an easy way to welcome a new food to your holiday table!
 Cranberry pomegranate sauce is a playful twist on a
familiar favorite: an easy way to welcome a new food to your holiday table!
Cranberry pomegranate sauce is a playful twist on a
familiar favorite: an easy way to welcome a new food to your holiday table!Pomegranate Seeds With No Mess! December 19 2012, 13 Comments
 A quick tip for how to seed a pomegranate the easy and fun way,
with no mess!
A quick tip for how to seed a pomegranate the easy and fun way,
with no mess!
 A quick tip for how to seed a pomegranate the easy and fun way,
with no mess!
A quick tip for how to seed a pomegranate the easy and fun way,
with no mess!Broiled Grapefruit Recipe (Week 49, 52 New Foods) December 17 2012, 6 Comments
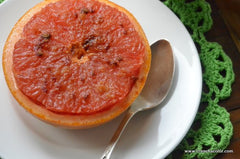 This deliciously simple broiled grapefruit recipe
adds a flavorful twist to your table: a sweet and juicy treat without a drop of
refined sugar.
This deliciously simple broiled grapefruit recipe
adds a flavorful twist to your table: a sweet and juicy treat without a drop of
refined sugar.
 This deliciously simple broiled grapefruit recipe
adds a flavorful twist to your table: a sweet and juicy treat without a drop of
refined sugar.
This deliciously simple broiled grapefruit recipe
adds a flavorful twist to your table: a sweet and juicy treat without a drop of
refined sugar. Mini Apple Pear Crisp (Week 48, 52 New Foods) December 10 2012, 7 Comments
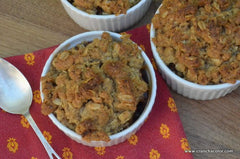 A mini apple pear crisp is the fresh food version of a big
warm bear hug! It's filled to the brim with sweet, bubbling fresh pears, apples and
cranberries -- the perfect treat to serve at a cozy winter get-together.
A mini apple pear crisp is the fresh food version of a big
warm bear hug! It's filled to the brim with sweet, bubbling fresh pears, apples and
cranberries -- the perfect treat to serve at a cozy winter get-together.
 A mini apple pear crisp is the fresh food version of a big
warm bear hug! It's filled to the brim with sweet, bubbling fresh pears, apples and
cranberries -- the perfect treat to serve at a cozy winter get-together.
A mini apple pear crisp is the fresh food version of a big
warm bear hug! It's filled to the brim with sweet, bubbling fresh pears, apples and
cranberries -- the perfect treat to serve at a cozy winter get-together. Romanesco: Broccoli with a Twist (Week 47, 52 New Foods) December 05 2012, 10 Comments
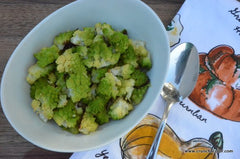 Romanesco was a new discovery for my kids and me this
week! This spiraling spectacle looks like a cross between broccoli and
cauliflower, and made a deliciously fun addition to our family table.
Romanesco was a new discovery for my kids and me this
week! This spiraling spectacle looks like a cross between broccoli and
cauliflower, and made a deliciously fun addition to our family table.
 Romanesco was a new discovery for my kids and me this
week! This spiraling spectacle looks like a cross between broccoli and
cauliflower, and made a deliciously fun addition to our family table.
Romanesco was a new discovery for my kids and me this
week! This spiraling spectacle looks like a cross between broccoli and
cauliflower, and made a deliciously fun addition to our family table.Veggie Pancakes (Week 46, 52 New Foods) November 28 2012, 5 Comments
 Veggie pancakes? You bet! Carrot and zucchini come together to make a tasty,
easy veggie pancake perfect for brunch or to munch at lunch!
Veggie pancakes? You bet! Carrot and zucchini come together to make a tasty,
easy veggie pancake perfect for brunch or to munch at lunch!
Gluten-Free Stuffing: Quinoa Stuffing with Apple, Sweet Potato and Walnuts (Week 45, 52 New Foods) November 19 2012, 17 Comments
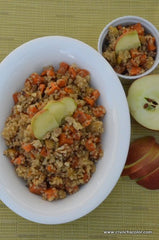 This easy
recipe for gluten-free stuffing made with quinoa, apples, sweet potato and
walnuts is the ticket for a healthy twist on a holiday favorite.
This easy
recipe for gluten-free stuffing made with quinoa, apples, sweet potato and
walnuts is the ticket for a healthy twist on a holiday favorite.
 This easy
recipe for gluten-free stuffing made with quinoa, apples, sweet potato and
walnuts is the ticket for a healthy twist on a holiday favorite.
This easy
recipe for gluten-free stuffing made with quinoa, apples, sweet potato and
walnuts is the ticket for a healthy twist on a holiday favorite.Easy Butternut Squash Soup: Recipes for Your Holiday Table (Week 44, 52 New Foods) November 12 2012, 2 Comments
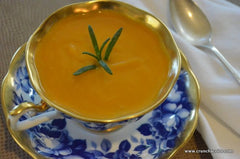 This easy butternut squash soup recipe is a must for your holiday table! It’s a
healthy version of my favorite holiday soup – and can be made ahead to give you more time to celebrate with
friends and family.
This easy butternut squash soup recipe is a must for your holiday table! It’s a
healthy version of my favorite holiday soup – and can be made ahead to give you more time to celebrate with
friends and family.
 This easy butternut squash soup recipe is a must for your holiday table! It’s a
healthy version of my favorite holiday soup – and can be made ahead to give you more time to celebrate with
friends and family.
This easy butternut squash soup recipe is a must for your holiday table! It’s a
healthy version of my favorite holiday soup – and can be made ahead to give you more time to celebrate with
friends and family.Butternut Squash Puree: Recipes for Your Holiday Table November 12 2012, 4 Comments
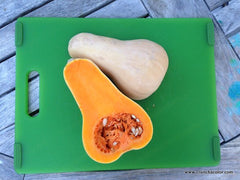 Butternut squash puree is easy to make and turns simple soups into hearty, healthy holiday dishes!
 Butternut squash puree is easy to make and turns simple soups into hearty, healthy holiday dishes!
 Persimmon: Recipes for Your Holiday Table (Week 43, 52 New Foods) November 05 2012, 23 Comments
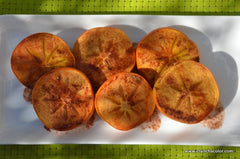 We tried several persimmon recipes and the kids voted for this easy and delicious baked persimmon dish. Move over baked apples! Persimmons will be the feature at our holiday table this year.
 We tried several persimmon recipes and the kids voted for this easy and delicious baked persimmon dish. Move over baked apples! Persimmons will be the feature at our holiday table this year.
 Homemade Pumpkin Pie from Scratch (Week 41, 52 New Foods) October 22 2012, 5 Comments
 Homemade pumpkin pie remains one of my favorite holiday treats -- bringing back
wonderful memories of festive family get-togethers and made from scratch
family recipes.
Homemade pumpkin pie remains one of my favorite holiday treats -- bringing back
wonderful memories of festive family get-togethers and made from scratch
family recipes.
 Homemade pumpkin pie remains one of my favorite holiday treats -- bringing back
wonderful memories of festive family get-togethers and made from scratch
family recipes.
Homemade pumpkin pie remains one of my favorite holiday treats -- bringing back
wonderful memories of festive family get-togethers and made from scratch
family recipes.How to Bake Pumpkin Seeds (Week 40, 52 New Foods) October 15 2012, 4 Comments
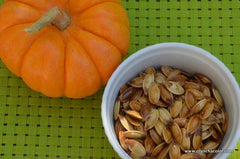 Teach your kids how to bake pumpkin seeds for a fun and tasty fall activity!
 Teach your kids how to bake pumpkin seeds for a fun and tasty fall activity!
 Savory Apple Soup with Pears and Walnuts (Week 39, 52 New Foods) October 08 2012, 13 Comments

Simple, savory apple soup is the best way to warm your kiddos from head to toe on a chilly fall day. Easy and fun to make, this tasty recipe brings together our favorite fall flavors for a cozy dish the whole family loves.
Cinnamon Apples (Week 37, 52 New Foods) September 24 2012, 1 Comment
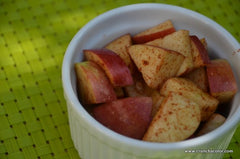
Cinnamon apples are a favorite fall treat for my kids. This easy recipe brings together the best of what goes into making a cozy apple pie, but without refined sugar.
Healthy Lunch Ideas: Sandwich Pops (Week 36, 52 New Foods) September 19 2012, 1 Comment

Need healthy lunch ideas? Sandwich Pops to the rescue! But watch out: you may find that friends are lining up to sneak a bite of these fun and easy sandwiches on a stick. Be sure to pack enough to share!
Tomato Pops: Pint-sized Tomato Mozzarella Skewers (52 Foods, Week 34) September 11 2012, 1 Comment

Tomato mozzarella skewers with a kid-friendly twist, this easy recipe for Tomato Pops makes the seasonal bounty of fresh picked cherry tomatoes even more fun to enjoy with your kids!
Homemade Granola Bars (52 New Foods, Week 34) August 31 2012, 10 Comments
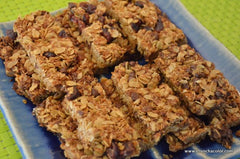
Homemade granola bars
are an easy and tasty lunchbox treat. This nut free granola bar recipe is made
with lots of love and no refined sugar, because your little ones are sweet
enough as they are!
This nut free, homemade granola bar recipe is fun and easy for kids to make. Although it’s a sweet treat, it is free of refined sugars. It can easily be modified to feature your favorite fixings. My kids added dried cranberries. Raisins or dates could easily be used as well. Have fun mixing it up!